
User Manual
Emailing Digital Forms & Appointment Reports
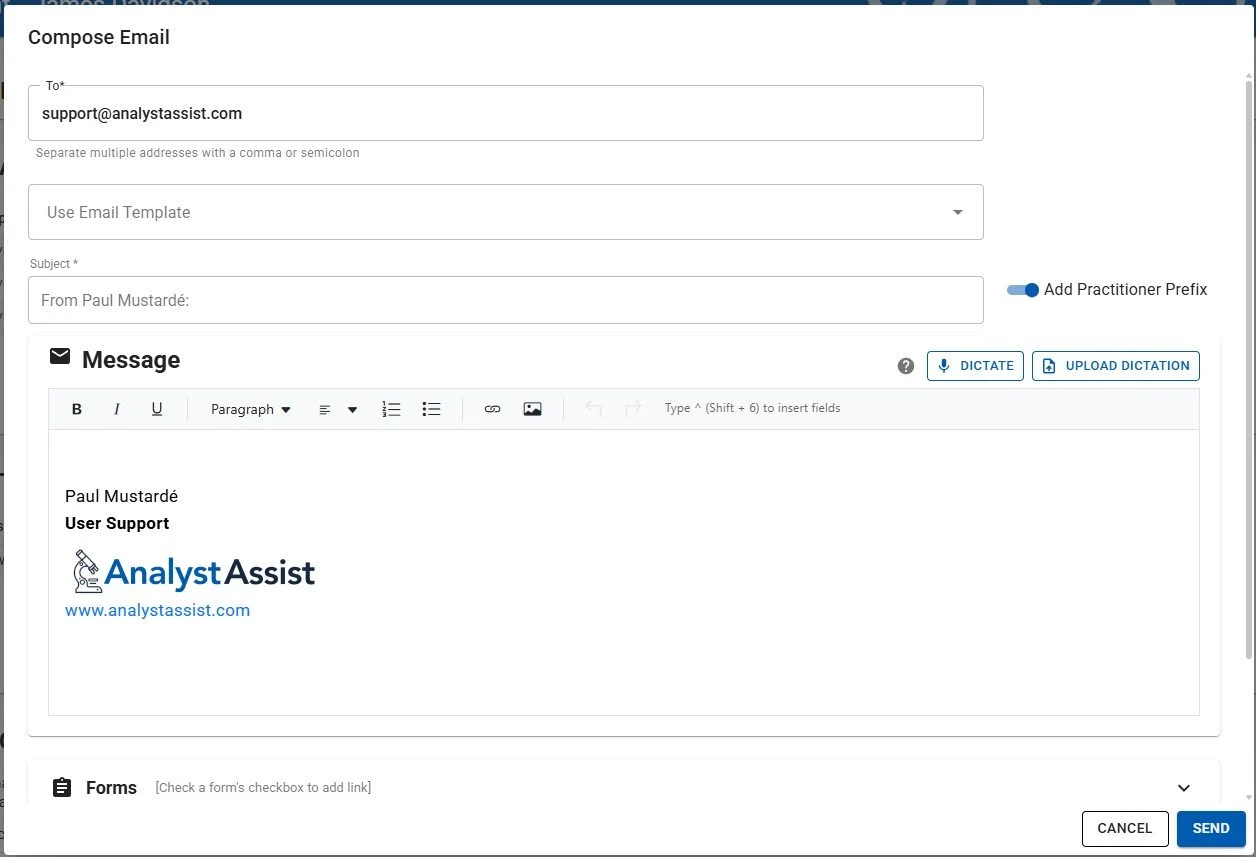
The Compose Email panel is where email messages for Clients/Patients are constructed and sent. Messages include:
Email address - Required field, added automatically from the Client/Patient record email field.
Subject - Required field, added automatically when a template is used, or can be added manually. When the ‘Add Practitioner Prefix’ switch is ON (and a Practitioner/Practice name is configured in the Settings page), the subject line is automatically prefixed so recipients recognise who the email is from.
Message - This is the body of the email, added automatically when a template is used, or can be added manually. The Message section uses the Dictation Rich Text Editor (DRTE) which you can learn how to use here. If an Email Signature is configured in the Settings page, it will appear automatically at the bottom of the message.
Email Template - Select one of the global Email Templates that are configurable in the Templates section of the Navigation Menu. Learn about customising / adding Email Templates here.
Forms - Add links to any of the digital Forms that are configured in the global Form Templates section of the Navigation Menu. When recipients click on the embedded link, they will be presented with a fillable form based on the template design. When they submit their completed form, the outcome will be added to the Client/Patient Documents Folder in the Client/Patient record automatically and a notification will be added to the Client/Patient Notes panel.
Client/Patient Documents - Add any documents or images that are stored in the Client/Patient record’s Document Folder, as attachments to the email.
Library Documents - Add any documents or images that are stored in the global Reference Library, as attachments to the email.
Clicking the ‘Cancel’ button will close the Compose Email panel before sending. Please note that doing so will delete all content from the draft email and reset the panel next time it is opened.
When you are ready to send the email to your Client/Patient, click the ‘Send’ button. You will be shown a floating confirmation message when the email has been sent, and a log entry will be added to the Client/Patient record Notes panel.
The recipient will receive an email from the ‘AnalystAssistMail’ mail server.
Please Note: By default, the email is sent with a ‘DoNotReply’ non-repliable email header. This means that if the recipient tries to reply to the email, it will be bounced. Pro users are able to configure a custom ‘Reply to’ address in the Settings page, so you can receive any replies from your recipients, directly to your mailbox.
Using templates
In order to speed up / automate your communications with Clients/Patients, email templates are a great way to ensure consistent and professional branding and interaction. Email templates are designed/managed in the Email Template design page.
In the Compose Email panel, when you click the ‘Use Email Template’ tab, a drop-down selector list of the global Email Templates is opened. Clicking one of those entries will load the selected template into the Email Composer. Clicking the Escape key, the ‘Use Email Template’ panel again, or anywhere else on the screen will close the drop-down selector if you don’t want to select a template.
Please Note: Templates with names preceded with ‘*’ are intended for use by Naturecure Academy students.
Depending on how the template is configured, it can include:
Subject - This will overwrite any existing text in the Compose Email dialog Subject field (Practitioner Name prefix will remain unless the switch is moved to the OFF position.
Message - This will overwrite any existing text in the Compose Email dialog Message field (apart from the Email Signature if one is configured in the Settings page). The content can include field tokens which will be replaced with data from the Client/Patient record when the email is sent, and are indicated by coloured text surrounded by %% characters. See the manual section on DRTEs for more information.
Please Note: By default, email templates do not have signatures at the end of the message. Remember to add your name/email signature to the messsage. Pro users can update the templates to include your name/email signature permanently.

Sending digital forms
Digital forms allow you to request information or consent from your Client/Patient easily. Forms are generated from Form Templates that are designed/managed in the global Form Templates designer page, and can include editable fields that automatically update the Client/Patients record.
Form links are sent to Client/Patients by email, and the recipient can complete then submit them at any time within 14 days. Form fields can be in a variety of formats (e.g. text, dates) and can be configured as ‘required’ so the form cannot be submitted until they have been completed.
Information entered into a digital form is auto-saved in the recipient’s browser cache. If a client can’t complete the process in a single session, the browser page is closed accidentally or the computer is shut down, as long as the same browser is used when the linked is clicked to open the form again, their information will be preserved.
On successful submission, the Client/Patient receives a confirmation message on screen. When the submitted form is received by AnalystAssist, the system automatically (whether you are logged in or not):
Updates any relevant fields in the Client/Patient record.
Adds the completed form as a PDF document to the relevant Client/Patient record’s Document Folder.
Adds a notification in the Client/Patient record Client/Patient Notes panel.
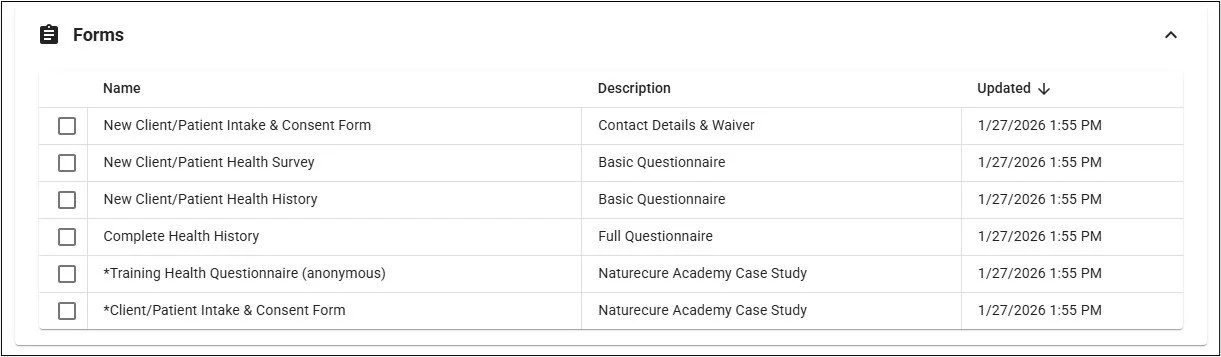
Adding form links to the email
Clicking the ‘Forms’ panel below the Message panel will open a drop-down selector with a list of all available global Form Templates. The order of the templates can be sorted by the various columns by clicking the relevant column header - and arrow icon will indicate which column the table is being sorted by and whether ascending or descending. Again pressing the Escape key or clicking elsewhere on the screen will close the selector without selection.
Please Note: Templates with names preceded with ‘*’ are intended for use by Naturecure Academy students.
To add an embedded form link to the email:
Select one or more form templates from the selector list by checking their checkbox.
Under the existing text in the Message panel, an entry for each selected form will be added that says “Please complete: “ and then a link to the fillable form. After sending, this link will stay active for 14 days. The recipient simply has to click this embedded link in the received email to open the form in a new browser page.
To test what the form will look like, click the link and the Form Preview will appear in a new browser tab.
If you want to remove a form link from your email, simply uncheck the checkbox next to the relevant form template name.
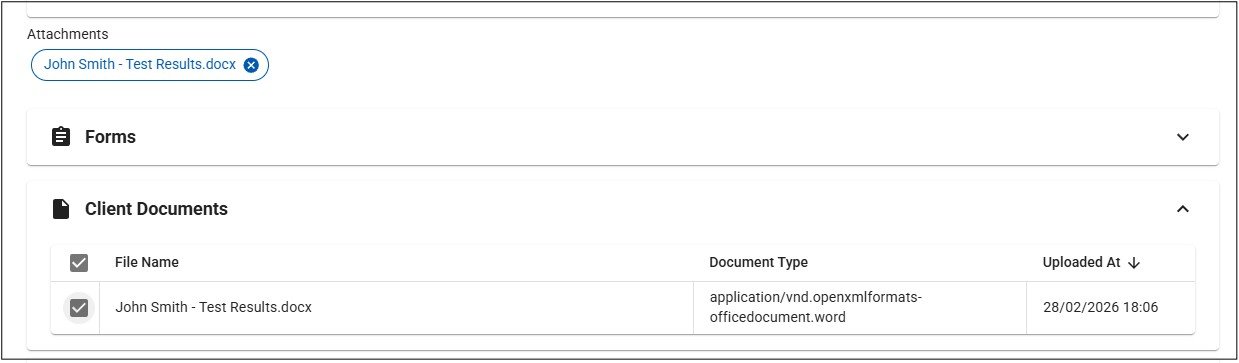
Adding Client/Patient Documents (incl. Appt Reports)
You can attach copies of any documents or images (e.g. Appointment Reports) that are contained in the Document Folder of the Client/Patient record to your email. This is done from the ‘Client/Patients Documents’ panel in the Compose Email panel, beneath the Message window.
Clicking the ‘Client/Patient Documents’ panel will open a drop-down selector with a list of all available documents. The order of the documents can be sorted by the various columns by clicking the relevant column header - and arrow icon will indicate which column the table is being sorted by and whether ascending or descending. Again pressing the Escape key or clicking elsewhere on the screen will close the selector without selection.
To attach a Client/Patient document to the email:
Select one or more documents from the selector list by checking their checkbox. You can select ALL documents in the folder by checking the checkbox on the Header row of the table.
Under the Message panel, an ‘Attachments’ panel will appear, with a tag for each attached document.
To preview any document, click the File Name in the selector list, and it will open in the File Preview panel. This panel can be used to iterate through previews of all the documents in the list.
If you want to remove an attachment from your email, simply uncheck the checkbox next to the relevant document name, or click the ‘X’ icon in the attachment tag, to remove it.
Adding Reference Library Documents
You can attach copies of any documents or images (e.g. Media articles or treatment instructions) that are contained in the global Reference Library to your email, using the ‘Library Documents’ panel in the Compose Email panel, beneath the Message window.
Clicking the ‘Library Documents’ panel will open a drop-down selector with a list of all available documents. The order of the documents can be sorted by the various columns by clicking the relevant column header - and arrow icon will indicate which column the table is being sorted by and whether ascending or descending. Again pressing the Escape key or clicking elsewhere on the screen will close the selector without selection.
To attach a Library document to the email:
Select one or more documents from the selector list by checking their checkbox. You can select ALL documents in the folder by checking the checkbox on the Header row of the table.
Under the Message panel, an ‘Attachments’ panel will appear, with a tag for each attached document.
To preview any document, click the File Name in the selector list, and it will open in the File Preview panel. This panel can be used to iterate through previews of all the documents in the list.
If you want to remove an attachment from your email, simply uncheck the checkbox next to the relevant document name, or click the ‘X’ icon in the attachment tag, to remove it.
