
User Manual
Dictation Rich Text Editor (DRTE) panels
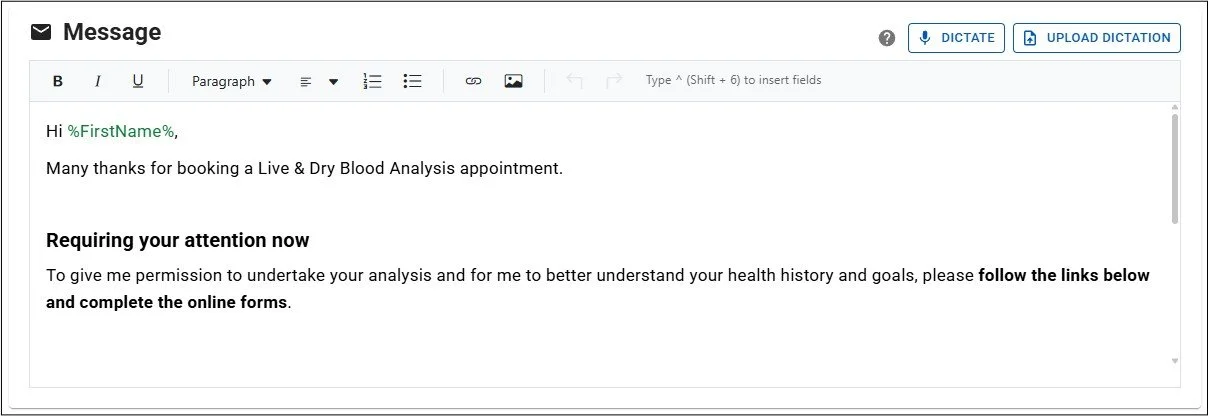
Dictation Rich Text Editor panels are found in the Compose Email dialog and the Interpretation & Recommendation panels in Appointment Records. These panels are for constructing sections of text to be embedded in emails or reports.
There is also a simplified version used in the Settings page for Email Signatures. The version in that situation does not offer voice dictation or field token insertion.
DRTEs include several key features:
Rich text editing - Add text with various formatting elements including font size, font styles and bullet points.
Hyperlinks - Configure sections of text to be hyperlinks for linking to webpages.
Image insertion - Add images such as business logos to text sections.
Field token insertion - Add field tokens that are replaced by data from the relevant Client/Patient record or Appointment record.
AI-powered Dictation - If you have a microphone configured for your computer, you can dictate live and the converted and formatted text will be added to the DRTE. Alternatively, you can upload a pre-recorded .wav sound file containing speech, that will be converted and added to the panel content.
Rich text editing
The DRTE panel allows you to add text and format it. Click on the panel with your mouse left button to place the cursor, which is where typed text will appear. To drop a line within the paragraph use Shift+Enter on your keyboard, or to start a new paragraph click the Enter button on your keyboard.
When you add or change content, the system will auto-save all changes. Make sure to wait for the green ‘Saved’ icon to appear after each change, before navigating away from the panel - only then will changes be saved to the database.
To format a section of text, select it using your mouse by moving the cursor to the start of the desired section and press and hold the left mouse button. Then while continuing to hold the left mouse button move the cursor to the end of the desired section and let go of the left mouse button. The required section should be highlighted. Next choose one or more of the following options to format the text, or click the same button a second time to remove the formatting:
Bold / Italic / Underline
Font Size - click the drop-down menu (that says Paragraph by default) and select a Header size or Paragraph font size
Alignment - choose whether the text on the selected line is left, right or centre aligned, or justified (aligned to left and right ends).
Numbered list / Bullet point list - all lines within the selected paragraph are structured into lists with numbers or bullet points
Please Note: The DRTE uses your browser’s default spell-check functionality, which appears as red lines under incorrect text. To set the language being checked against or if it is not working, click your mouse right button over the panel and select the appropriate settings.
Adding hyperlinks or images
The DRTE also allows you to add hyperlinks and images to your text:
Creating a Hyperlink - highlight a section of text and click the hyperlink button to open the ‘Insert Link’ dialog.
Web address - add the URL that you want to link to.
Display Text - should already display the section of text to form the hyperlink. This can be adjusted here in future if required.
Title - serves as advisory text that provides additional information about the link. When users hover their mouse over the link, browsers typically display this title text as a tooltip.
Open link in new window - select whether the link should trigger a new browser page to display the result.

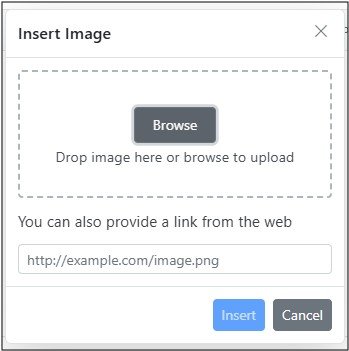
Insert an image - click on any row of the panel to position the cursor and then click the Image button to open the ‘Insert Image’ dialog to insert an image at that position. Then within the ‘Insert Image’ dialog:
Browse for image - click the ‘Browse’ button to open your computer’s file explorer. Navigate to the required image in your folders, select it and click ‘Open’ or ‘Upload’ to add the selected image.
Drag and drop image - if you have a folder open on your computer (or your desktop) with the required image file displayed, click and hold your left mouse button on the file icon, still holding the left mouse button move your cursor to the image drop panel in the Insert Image dialog and then release the mouse button. A copy of the image will be transferred to the ‘Insert Image’ dialog.
Provide a link - instead of adding an image file manually, you can insert the URL of a specific image on the web and it will be imported to the dialog.
Insert or Cancel - Click the ‘Insert’ button to add the selected image to the DRTE or ‘Cancel’ to close the ‘Insert Image’ dialog without adding an image to the DRTE.
Field token insertion
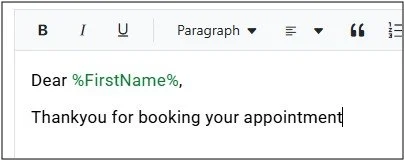
To make Report or Email creation efficient and customised for every Client/Patient, it is possible to add generic field tokens that are replaced by actual Client/Patient or Appointment data when the report is generated or the email sent. These tokens are represented by the field name book-ended by % chars e.g. %LastName%.
The list of available field tokens depends on where the DRTE is being used (Compose Email dialog/Email templates or Appointment record), and it is displayed by typing the char ^ (shift + 6):
Click the DTRE panel to place the cursor where you would like the field token to be added.
Type ^ (shift + 6) on your keyboard - this will open a drop-down selector list that includes all the available field tokens.
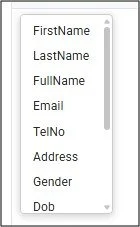
Select a field token in the list, and the list will close and the field token will be inserted in the text panel as a coloured word surrounded by %%.
Available field tokens
The following tokens are available in the Compose Email dialog & Appointment Record’s Interpretation & Recommendations panels:
First Name
Last Name
Full Name - The Client/Patient’s First Name followed by Last Name
Email
TelNo - Telephone Number
Address
Gender
Dob - Date of Birth
Age
PrevAppt - When in Compose Email panel = the date of the Client/Patient’s most recent Appointment. When in Appointment Reports = the date of the appointment previous to the open one.
NextAppt - When in Compose Email panel = the date of the Client/Patient’s next Appointment. When in Appointment Reports = the date of the appointment after the open one.
Created - The date that the Client/Patient record was created
ClinicAdd - The global ‘Main Clinic Location’ as set in the Settings Page
In the Appointment Record’s Interpretation & Recommendations panels, the field token list includes the above tokens as well as these additional ones:
ApptDate - The date of the Appointment record that is currently open
ApptTime - The time of the Appointment record that is currently open (if set)
ApptLocation - The ‘Location’ selected in the Appointment record (if set)
Dictation
One of the most powerful features of AnalystAssist is the AI-powered dictation functionality, which makes writing reports or emails a much quicker process than doing so manually.
There are two methods of adding dictated text to a DRTE panel:
Live dictation - using your computer’s microphone, speak normally and AnalystAssist will automatically convert your speech into fully punctuated text paragraphs.
Upload dictation files - using your phone or recording device, produce .wav speech files, then upload them to AnalystAssist where the system will again convert them to punctuated text.
Live Dictation
This method requires you to have a microphone configured for your computer, whether inbuilt or as an external device.
NB: Make sure that there is no background noise that might interfere with the dictation process, and that your microphone is sensitive enough. The clearer that you speak, with pauses between sentences, the better chance the system has of being accurate.
Click the DTRE panel to place the cursor where you would like the dictated text to be added.
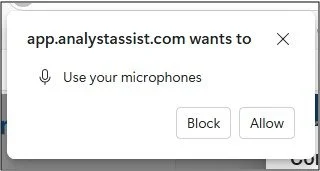
Click the ‘Dictate’ button and if there is a microphone available, the first time that you use this function the browser will ask you to give permission to access it. Click ‘Allow’ to give permission (if you are given options you can select to only give permission to this particular website).
Please Note: If clicking the ‘Dictate’ button doesn’t trigger access to your microphone, then check your computer’s Settings in the Microphone or Sound section to make sure that the microphone is properly configured.
When the app has received access to your microphone, and is ready for dictation, you will see a red ‘Stop Dictation’ button and a pulsing red mic icon (it may take several seconds for the system to engage - please be patient).
To stop the dictation process at any time, simply click the ‘Stop Dictation’ button and the session will end. If you switch focus to a different browser tab, browser or other app on your computer, dictation will be cancelled automatically.
When you are ready to start dictating, just speak normally but clearly and the microphone will pick up your voice. Make sure to pause very briefly at the end of each sentence (as you would normally), and the dictation process will add a punctuated version of your sentence to the DTRE panel.
Special voice commands:
With your mouse click the ? help icon next to the Dictate button for a reminder of available commands.
To start a new paragraph, after a short pause say “enter”. To move to the next line within a paragraph, after a short pause say “new line” or “next Line” (equivalent of Shift + Enter on your keyboard). To move to the end of the current paragraph, after a short pause say “end”.
To stop the dictation process, after a short pause say “stop”.
To remove the last section of text added by the dictation engine, after a short pause say “undo”. To reverse the change say “redo”.
To start a bullet-point list, after a short pause say “bullet”, and to end the list say “end list” or “enter” twice.
To start a number list, after a short pause say “number”, and to end the list say “end list” or “enter” twice.
Within either list, saying “enter” will drop you to the next list item, and “end” will take you to the end of the current list item.
Please Note: As with any software dictation process, errors in final text are possible. Make sure to check all text after completing the process. If the process is patchy, try increasing your computer’s microphone sensitivity.
NB: If there is no dictation for 30 seconds, the dictation process will end automatically.
Upload Dictation
This method involves importing audio speech recordings into AnalystAssist. Recordings must only contain speech and must be recorded using a .wav filetype, otherwise they will be rejected.
Click the DTRE panel to place the cursor where you would like the dictated text to be added.
Click the ‘Upload Dictation’ button, which will open a File Explorer dialog on your computer. Browse your stored files until the sound file is located, click it to select it and then click the ‘Open’ button in the dialog to upload the file. Alternatively, click ‘Cancel’ to close the dialog without uploading a file.
AnalystAssist will import the recorded speech and convert it into punctuated text, that will be added to the DRTE panel.