
User Manual
Reference Library
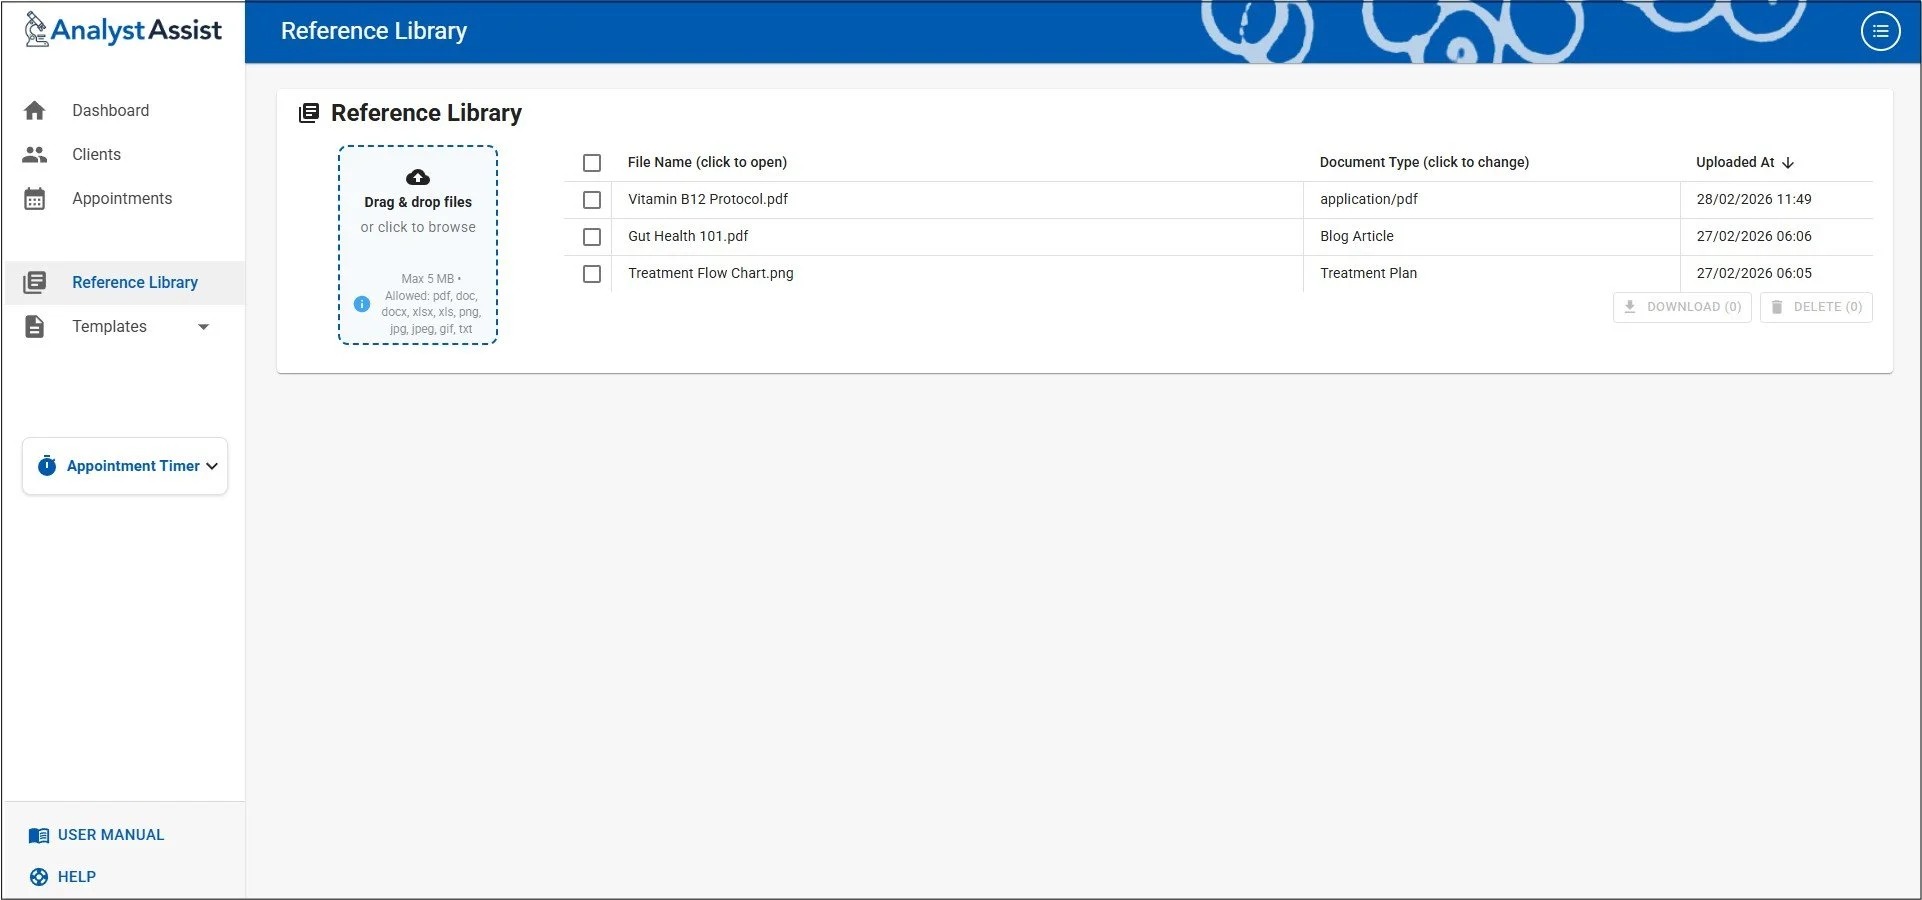
The Reference Library page is where Users can upload any reference documents that may be attached to Client/Patient emails alongside Form links and Reports. This feature allows you to add generic treatment protocols, terms & conditions documents, research articles or any other type of document that might be useful to your Client/Patients.
Adding documents to emails is done in the Email Composer dialog by selecting the required document from a drop-down list populated from the contents of the Reference Library page.
Table columns:
File Name - the original filename of the uploaded document
Document Type - defaults to the original upload filetype, but can be customised to one of the system Document Types that can be managed in the Settings page.
Uploaded At - The Date/Time when the document was uploaded to AnalystAssist
Please Note: Free Trial accounts are limited to 5 Library Documents. Subscribe to the Pro version in order to be able to add unlimited Reference Documents.
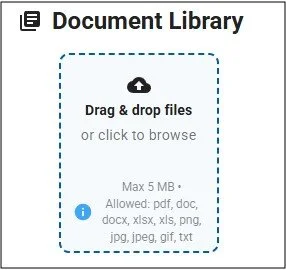
Uploading documents
Documents can be added to the Reference Library that are up to 5MB in size and are one of the following filetypes: .pdf / .doc / .docx / .xlsx / .xls / .png / .jpg / .jpeg / .gif / .txt
Drag & drop - From anywhere on your computer’s desktop or file manager, hover over the file, press and hold the left mouse button, drag the copied file to the blue ‘Drag & drop’ panel and let go of the mouse button. The file (if it meets the specifications above) will be uploaded automatically to the database and displayed in the Reference Library table.
Browse for a file - Click the blue panel and the File Upload dialog will appear. Browse your computer’s storage for the desire file and click it to select. Then click the ‘Open’ or ‘Upload’ button to upload the file into the database and display it in the Reference Library table.
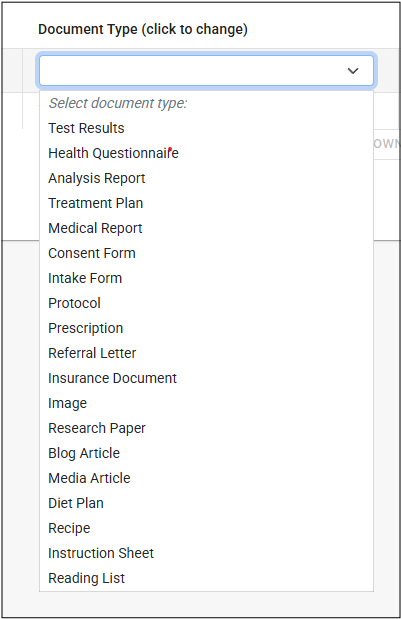
Setting the Document Type
Documents can be better identified by setting a Document Type from the system Document Type list (managed in the Settings Page). This also allows you to sort the list by document type (see below).
Changing a document’s type - Click the ‘Document Type’ cell of the relevant Document row and a drop-down menu containing all the system Document Types will appear. To select a particular Document Type, click the entry in the drop-down list, and the Reference Library row will be updated with the new value. If you change your mind after opening the drop-down list, hit the Escape key on your keyboard (not Safari), or just click elsewhere on the screen, to close it.
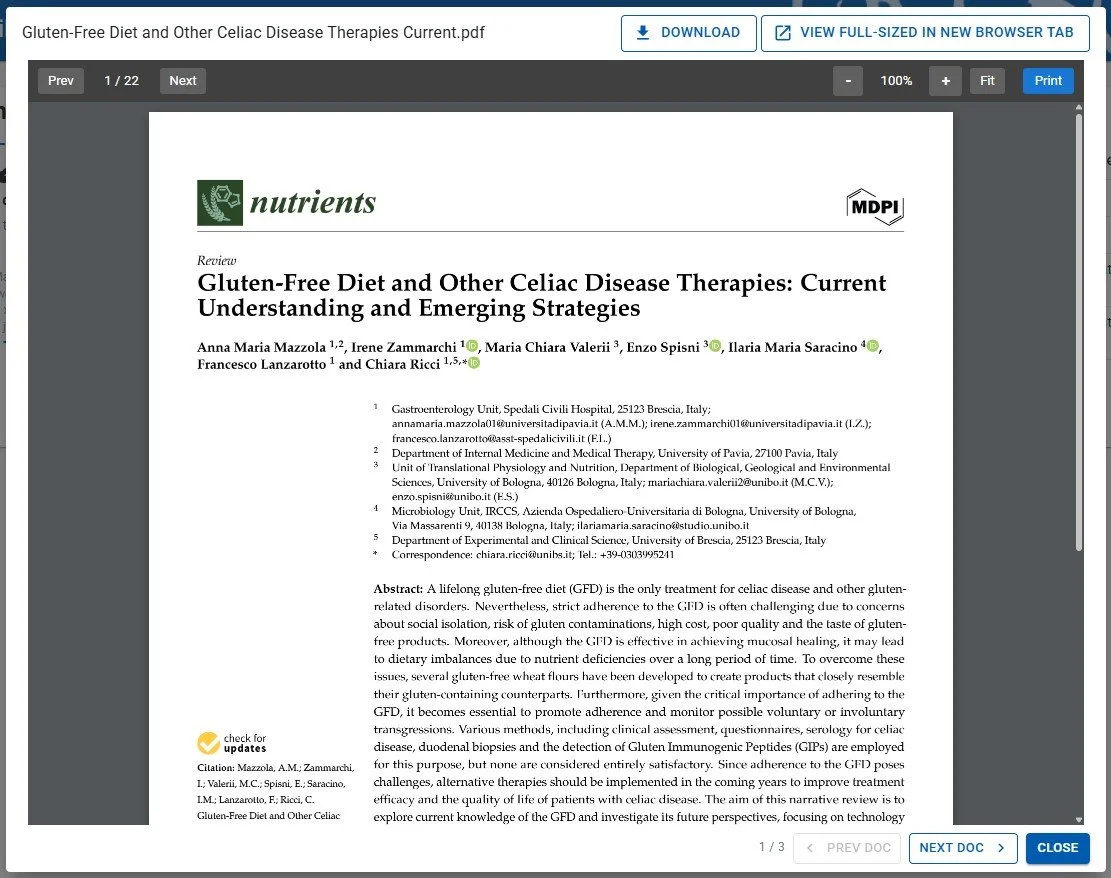
Previewing pdf documents
Viewing pdf documents - click any document row in the Library table and the File Preview dialog will open, displaying the contents of the Library document in preview mode. It is then possible to view a high definition version of the document full-sized in a second browser window, by clicking the ‘View full-sized in new browser tab’ button at the top of the dialog.
Use the ‘Prev’ & ‘Next’ buttons to navigate between pages of the document, and use the zoom buttons to change the document view.
Printing documents - The File Preview dialog allows you to print the document using the button in the menu bar.
Download the document - There is also a button at the top of the dialog to download the file to your browser’s Download folder.
Prev Doc / Next Doc - use the buttons in the bottom right corner to move between any previous or next documents in the library.
Closing the File Preview dialog - Click the ‘Close’ button in the bottom-right corner of the dialog, the ‘Escape’ key on your keyboard (not Safari), or simply click somewhere outside the dialog on your screen to close the File Preview dialog.
Previewing other document/file types
Viewing images - click any image file in the Library table and the Image Preview dialog will open, displaying the contents of the Library document in preview mode. It is then possible to view a high definition version of the image full-sized in a second browser window, by clicking the ‘View full-sized in new browser tab’ button at the top of the dialog.
Closing the Image Preview dialog - Click the X close button in the top-right corner of the dialog, or simply click somewhere outside the dialog on your screen to close the Image Preview dialog.
Microsoft Office files - When you click a Library document that is a Microsoft Office file (e.g. .xlsx or .docx), the file will be downloaded to your browser’s Download folder so that it can be opened manually.
Downloading / Deleting documents
To select specific documents in the Library, check the relevant checkbox or check the checkbox in the header row of the table to select all documents. Doing this will enable the Download and Delete buttons:
Downloading documents to your computer - The Download button will download all selected documents to the Download folder of your browser.
Deleting documents - The Delete button will open the Delete Confirmation dialog asking for confirmation. Clicking ‘Delete’ will permanently remove the selected documents from the database.
Ordering rows
Select a column heading - It is possible to sort the full list by any of the displayed fields, by clicking the relevant column heading. This will display an ‘Up’ or ‘Down’ arrow next to the column heading, indicating sorting by Ascending or Descending values.
