
User Manual
Live View panel
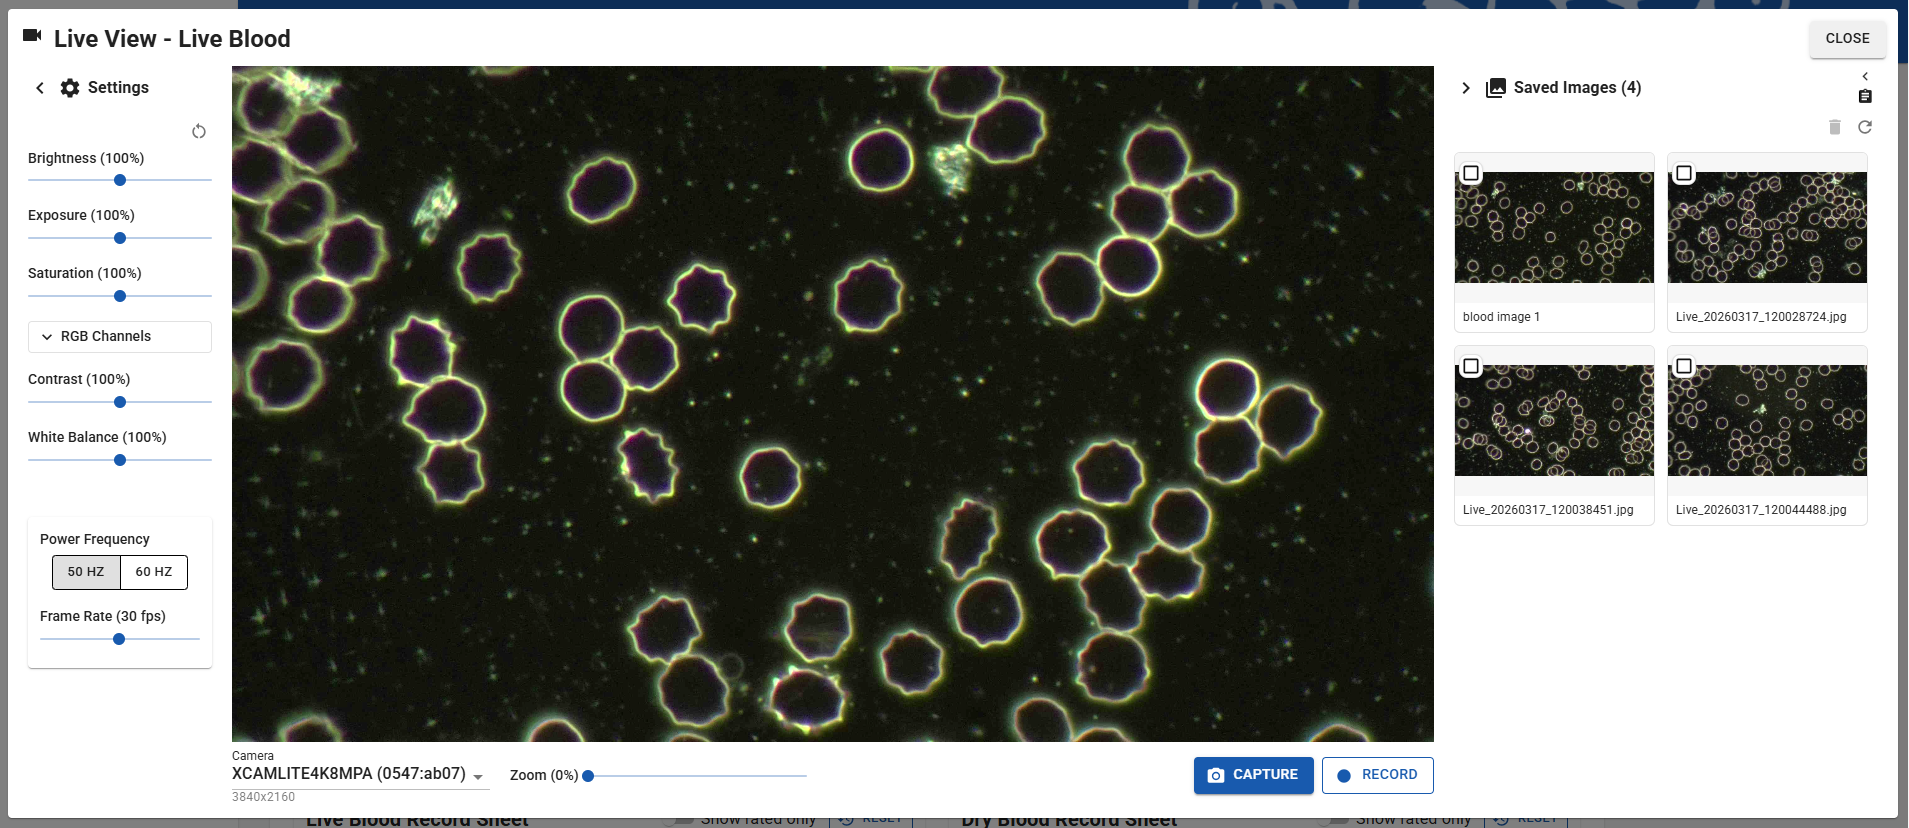
The Live View panel is accessed from Live & Dry Blood Images panels in Appointment Records, and is where AnalystAssist connects with your microsope camera and displays the camera feed. The Live View panel also enables you to:
Capture the images that you see on screen, and insert them into the Appointment Record.
Add Indication Ratings into the relevant Blood Record Sheet.
The panel is also accessible from the Dashboard using the ‘Test Cam’ button. This option is for setting up your camera, and making sure that AnalystAssist has access. It is possible to capture images in this mode, but in this test scenario they are saved directly to the Downloads folder of your browser.
NB: See the ‘Connecting to your microscope camera’ section below when first setting up AnalystAssist
It is also possible to save a video of the live feed (max 60 secs) in both versions. Video files are saved to the Downloads folder of your browser and NOT stored in the AnalystAssist database. Files are stored in .mp4 format (or WebM in certain browsers).
Please Note: For data compliance purposes, files saved to the Downloads folder of the browser are non-identifiable to Client/Patients and only include the date/time of capture in the file name.
Live View panel features include:
Main video image panel - this section displays the current live feed from the selected camera (as long as your browser has permission to access a camera).
Camera control panel - under the video image panel, this panel includes a drop-down selector to choose which camera feed is being used, a slider to zoom the image in and out, and the main ‘Capture’ button for taking a screenshot of the image displayed and ‘Record’ button for recording a video of the live feed.
Settings panel (collapsible) - allows you to adjust image settings such as brightness, contrast, or even the power frequency for your local electricity grid (to prevent flashing).
Saved Images panel (collapsible) - this section shows the saved images for either the Live or Dry Blood Images panel of the current Appointment (depending on which panel was used to trigger the Live View panel). Thumbnails displayed here can be clicked to view a large version of the image or update the Image Notes. It is also possible to change image titles, and delete images from the database here (NB: Panel disabled in ‘Test Cam’ mode).
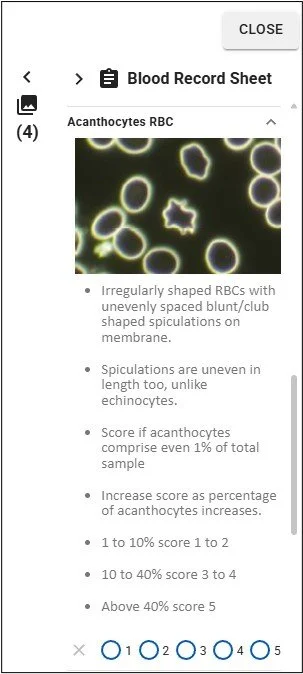
Blood Record Sheet panel (collapsible) - this is a duplicate of the main Blood Record Sheet panel in the Appointment record, and allows you to rate blood Indications whilst scanning blood slides. See this page of the User Manual for more information about Blood Record Sheets.
Any changes made here will be reflected in the main Blood Record Sheet in the Appointment record (and vice versa) - changes are auto-saved.
You are also able to view each Indication’s Notes panel by clicking the down arrow next to the indication.

The Live View panel can be closed at any point, by clicking the ‘Close’ button in the top-right corner. Doing so will automatically update the Appointment Record Blood Images panel that you used to trigger the Live View panel, with any changes to the image gallery and/or image names or notes (NB: Not with ‘Test Cam’ mode).
Please Note: Inactivity Timout of your AnalystAssist login is suspended when the Live View panel is open.
Connecting to your microscope camera
One of the first tasks needed when you start using AnalystAssist is to connect your microscope camera to your computer, and then make sure that AnalystAssist can access it.
Although AnalystAssist is designed to be used with a USB digital microscope camera, there are 2 camera options that we will discuss here:
USB digital microscope camera connected to your computer’s USB port (preferred).
Canon DSLR camera using ‘Live View’ mode and connected via the camera’s USB port.
Please Note: You are strongly recommended to maintain an alternative way of capturing images from your microscope. Should access to AnalystAssist be interupted due to internet connectivity, scheduled maintenance or other issues, you can continue to conduct appointments, and then import the images into AnalystAssist later. Make sure images are less than 4MB file size.
USB Digital Microscope Camera
In this scenario, you will have a USB cable from the camera that should be plugged into a USB port on your computer. It may be advisable to go to the ‘Camera’ section of your Operating System’s Settings screen and make sure that the computer recognises it. There may be driver software that you need to install in order to make this happen.
Once your computer has recognised the camera:
Open AnalystAssist and log in.
In the Dashboard, click the ‘Cam Test’ button to open the preview version of the Live View panel.
When the Live View panel opens, it will try to do so using your computer’s default camera choice. If this is the first time using this browser, a window should appear asking you to grant permission for the browser to access the camera.
Give the browser permission to access the camera. Wait a moment and the live feed from the camera should appear on screen. If it is dark, make sure that the microscope has a light source switched on, or alternatively pull the camera out of the microscope trinocular and let room light enter the sensor - you should see blurred images on screen.
NB: If you still don’t see an image, open the ‘Camera’ drop-down selector at the bottom of the Live View panel, and make sure that the correct camera model is selected.
Mount a slide with a sample of something on the microscope, increase the illumination until you see an image on screen, and adjust the microscope focus apparatus until the image on screen is focused.
Canon DSLR camera
The process for connecting a Canon DSLR camera to AnalystAssist involves a few more steps.
Please note: The steps discussed below involve the installation of Canon software to convert your camera output to a USB webcam format. As doing so introduces potential software, hardware or operating system issues not related to running AnalystAssist through a browser, you do so at your own risk, and AnalystAssist Support cannot offer more than basic advice for connecting a DSLR to your computer - contact Canon Support for technical support & installation issues.
Before your computer can access a live feed from the camera, you need to do the following:
Go to https://www.canon.co.uk/cameras/eos-webcam-utility/ and download EOS Webcam Utility Pro for your operating system (Windows or Mac). This is the free version (see below) of a software application from Canon that enables you to use your DSLR camera as a webcam.
Install the software package, giving any permission requested.
Connect your camera to a USB port on your computer using a suitable USB cable for your camera’s USB out port.
Switch the camera to ‘On’ at the main power switch on the camera body and turn the main dial on top to ‘P’ (you are advised to use a mains power adaptor for your camera model, to allow longterm use without the need for battery changes).
If you haven’t already set the Canon camera image size to Medium, click the ‘Menu’ button on the camera body. Locate ‘Image Quality’ which is usually in ‘Shooting Menu 1’ (the first red camera icon tab). If not, use the navigation buttons on the back to move through the camera menu. Click the ‘Image Quality’ option to open it and set the size to ‘M’ with the smooth curved icon. When you are done, click the ‘SET’ button to save the setting.
Make sure that you have closed down EOS Utility software (that can open automatically when you switch on your camera), as it will conflict with AnalystAssist.
Follow the steps in the ‘USB Digital Microscope Camera’ section above for connecting AnalystAssist to the camera feed, however to view the live feed from your camera, you will need to select ‘EOS Webcam Utility Pro‘ from the ‘Camera’ drop-down selector at the bottom of the Live View panel. That should display the live feed from your camera on-screen.
Please Note: Due to the configuration of the EOS Webcam Utility Pro, it may be necessary to boost the ‘Brightness’ or ‘Exposure’ settings within the AnalystAssist Live View Settings panel to achieve a satisfactory image on screen.
Subscription to EOS Webcam Utility Pro
Although the free version of EOS Webcam Utility Pro should enable you to conduct analyses using your Canon DSLR, the definition of the image is determined by the model of Canon DSLR (better cameras may offer a sharper image due to data transfer limitations by USB output in more affordable models). Also the software may limit the output resolution to 720p rather than a High Definition image of 1080p, which will give a smaller field of view visible in AnalystAssist.
To increase the output resolution to 1080p, open the EOS Webcam Utility Pro software, click ‘My Subscription’ and start a paid subscription. Then return to the EOS Webcam software, click the ‘Settings’ wheel top-right, and then ‘Video’ and select ‘1080p’. Restart the software and the next time you connect to AnalystAssist, you should see a higher-definition image. NB: Canon offer a 7 day free trial for this functionality.
Adjusting image settings
Once you have successfully gained access to your camera’s video feed through AnalystAssist’s Live View panel, you can make adjustments to the image in order to get it to match closer to what you see down the binoculars of your microscope.
To do this, click the Settings wheel icon at the top-left of the Live View panel to open the ‘Settings’ collapsible panel (click the wheel icon again to close the panel).
Adjustments are made by holding your left mouse button on the blue dot and dragging the slider. Possible adjustments are:
Brightness - increase/decrease the intensity of the lighter areas of the image.
Exposure - increase/decrease the intensity of the entire image.
Saturation - increase/decrease the amount of colour in the image.
RGB Channels - increase/decrease the red, green and blue levels of the image.
Contrast - increase/decrease the intensity differential between bright and dark areas of the image.
White Balance - increase/decrease the warmth of the image by changing the Kelvin value (higher values appear colder, lower values appear warmer).
Power Frequency - if your camera has this capability, this should auto-detect your local setting. (When incorrectly set, the unseen flickering of your microscope lamp conflicts with the flicker rate of the camera sensor causing a strobing/flickering effect on screen. Aligning both with the frequency of the local power grid resolves this issue.)
Frame rate - adjust the framerate that the camera feed is displayed at.
Please Note: Adjusting either the Power Frequency or the Frame rate will cause a ‘Restart Cam’ button to appear. Click this to properly induce your required changes.)
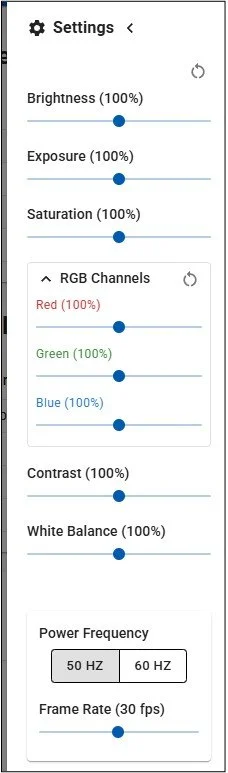
All Settings changes will be stored in your browser’s cache, until you click the circular ‘reset’ icon at the top of the Settings panel
Capturing & managing images
Please Note: Free Trial accounts are limited to 12 Live Blood and 12 Dry Blood images per appointment. Pro users can capture 25 of each.
Capture images
First of all, adjust the Zoom slider if necessary to change the size of image frame to be captured. Clicking the ‘Zoom’ label will reset the control.
Next, click the ‘Capture’ button to store what is seen on screen. A thumbnail version of the image will be added to the top of the Saved Images panel to the right.
To open the collapsible Saved Images panel, click the ‘Images’ icon in the top-right of the screen. Clicking it again will make the panel collapse.
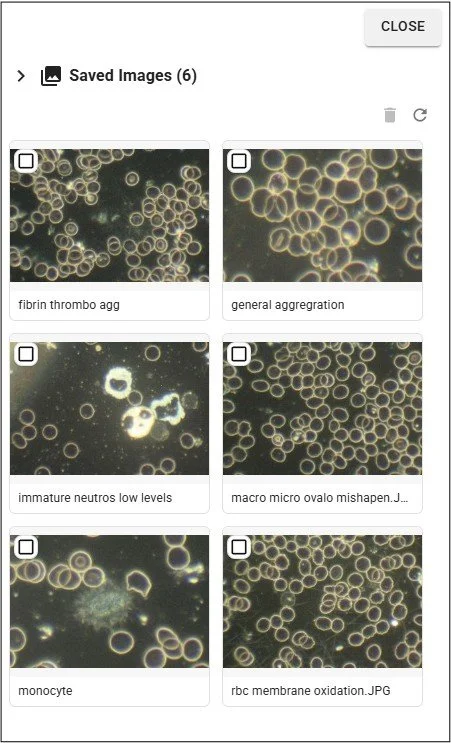
Please Note: Although thumbnails in the Blood Image panels of the Appointment Record are sorted alphabetically, in the Live View panel the most recent captures for this session are at the top of the Saved Images panel.
Delete images
To permanently delete one or more images from the database, check the checkbox in the relevant thumbnail(s) and click the red trashcan. The Delete Confirmation dialog will display.
If you click the ‘Delete’ button in the Delete Confirmation dialog to confirm deletion, the image will be deleted from the ‘Saved Images’ panel and also the Appointment Blood Images panel that you triggered the Live View panel from.
Click the ‘Cancel’ button or the ‘Escape’ key on your keyboard to close the Delete Confirmation dialog without deleting any images.
Rename images
Just like in the Appointment Blood Images panels, you can change the title of an image displayed under the image in a thumbnail.
To give images a more identifiable title, click on the title in any thumbnail to enter ‘edit mode’. Make any required changes and to save changes to the database, click the ‘Enter’ key on your keyboard. To exit without saving and revert to the previously saved title, click your ‘Escape’ key (not Mac) or click somewhere else on the screen. Duplicate image titles are not allowed.
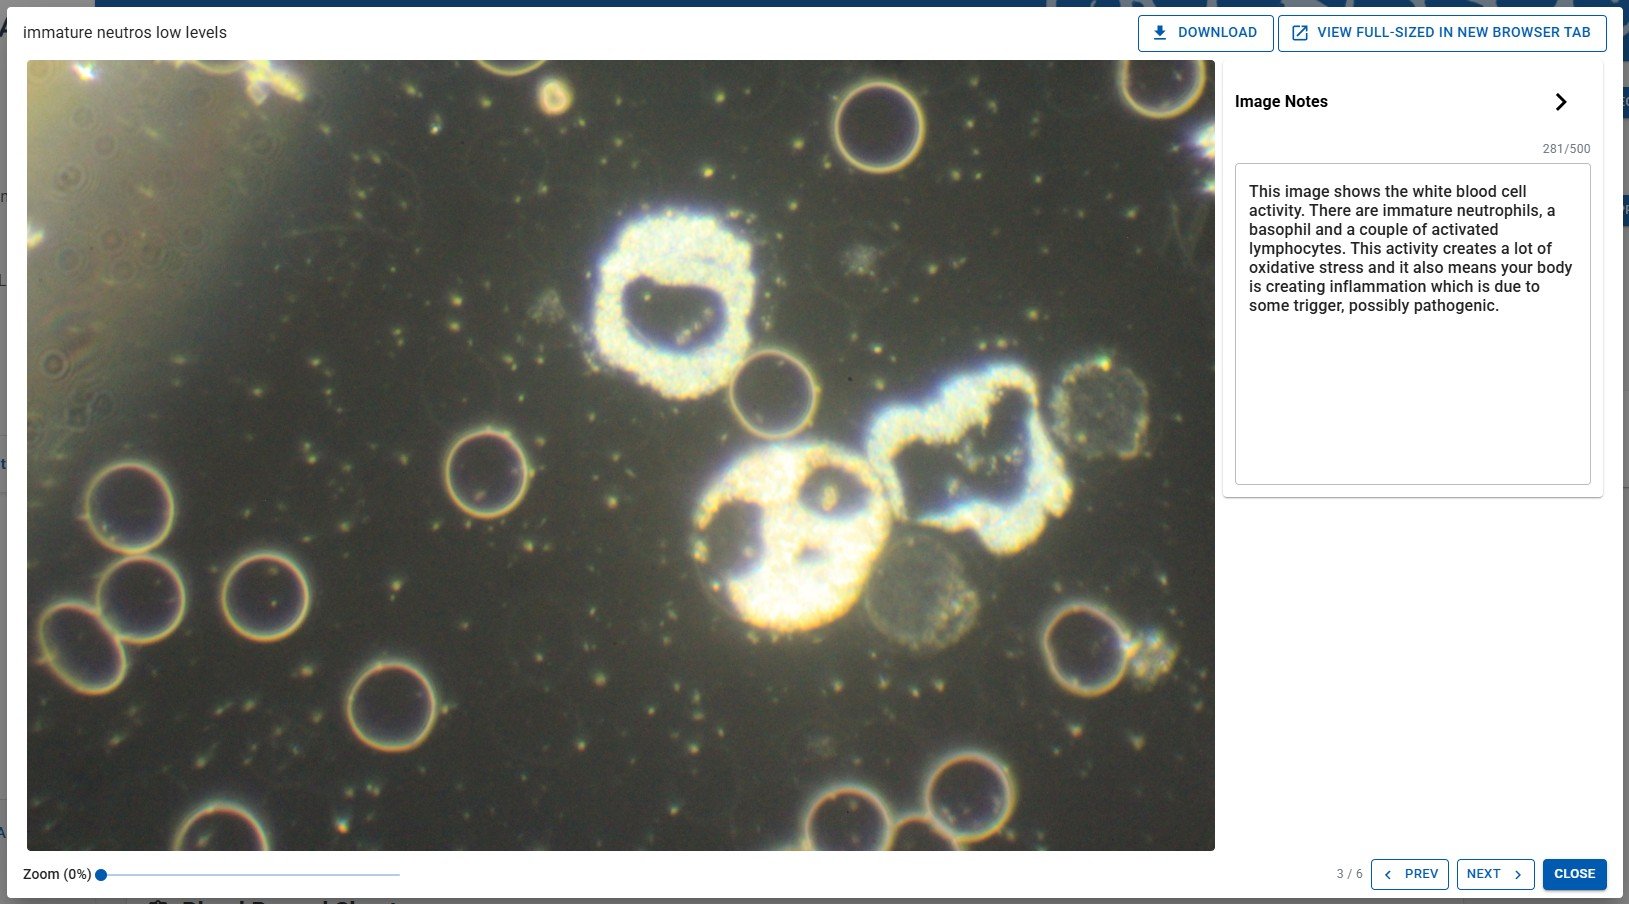
View large versions of images & add Image Notes
Click any thumbnail to open the Image View panel - this displays a large version of the image.
Image Notes - click the ‘Image Notes’ collapsible panel to open or close it. Add text in the panel and it will be saved automatically. These Notes can be viewed at any time in the Appointment Record by hovering your mouse cursor over the thumbnail, and can be included in Appointment Reports.
View the image full-size - click the ‘View full-sized image in new browser tab’ button to open a separate browser tab that displays the image full-size.
Download a copy of the image to your browser’s Download folder by clicking the Download button.
Zoom the image by adjusting the zoom slider. Click the word ‘Zoom’ to reset.
Prev / Next - use the buttons in the bottom-right corner to move between any previous or next images in the gallery.
To close the Image View panel, click the ‘Close’ button in the bottom right corner, click the ‘Escape’ key (not Macs) or click elsewhere on the screen.
Recording video
It is possible to record up to 60 seconds of live feed in the Live View panel. Video footage is stored as a .mp4 file (or WebM for some browsers) which is added to the Downloads folder of your browser:
Click the ‘Record’ button to start the recording process. The button will switch to a red ‘Stop’ button with a timer.
To finish recording, click the red ‘Stop’ button (or it will happen automatically after 60 seconds).
The video file (with date/time nomenclature) will be added to the browser’s Download folder, where it can be played or renamed.