User Manual
Appointment Record & Creating Reports
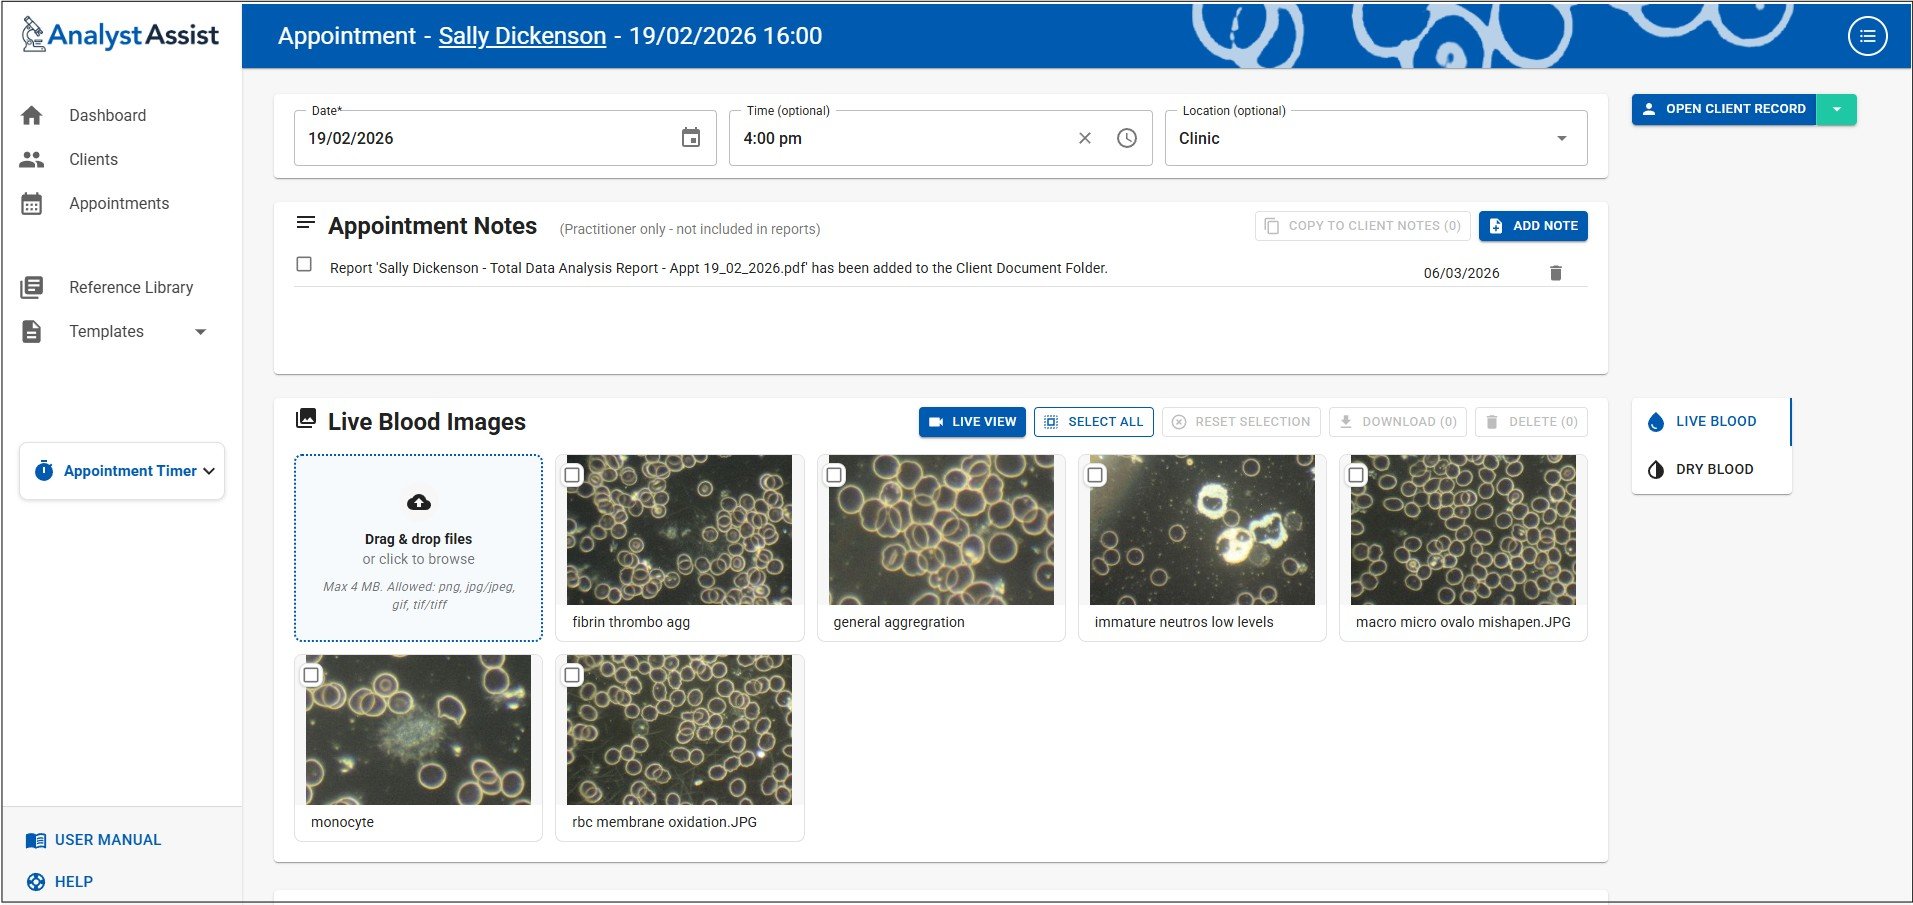
The Appointment Record is the heart of AnalystAssist, and where much of what is required during an actual Appointment is located:
Appointment details - Date, Time, and Location
Appointment Notes - Add Notes about your Client/Patient, their treatment plan or other key info.
Blood Images - With the help of the Live View panel, view the digital output from your microscope, and capture (or alternatively upload) and store both live and dry blood images.
Blood Record Sheets - Rate some or all of the indications that you see in the blood from 1 to 5 (or leave un-rated).
AI Tutor Panel - Automatically reviews all Appointment & Client data and suggests possible treatment pathways.
InterpretationPanel - A Dictation Rich Text Editor for recording your interpretation of what you see in the blood, and how your Client/Patient’s health picture may have changed since their last appointment.
Recommendation Panel - A Dictation Rich Text Editor for recording your treatment recommendations for your Client/Patient, and a Prescription / Protocol table for listing items such as supplements, treatments or healthcare techniques.
As well as recording all this information relating to the Appointment, from this screen you can:
Easily navigate to the Client’s Record - Click the Client/Patient’s name in the app title bar or the ‘Open Client Record’ button to navigate instantly in order to view all information or documents relating to your Client/Patient.
Easily navigate between Appointments - In order to compare Appointment data or outcomes, quickly navigate to the previous, next or last appointment for this Client/Patient, using the relevant buttons.
Generate reports - Using the default Report Templates (or custom ones that you have created), generate Appointment Reports that can include any combination and layout of the information contained in the Appointment Record. When generated, the report is added to the Client/Patient’s Document Folder, ready for attaching to an email and sending out to your Client/Patient.
Please Note: Free Trial accounts are limited to 5 Appointment records. Subscribe to the Pro version in order to be able to create unlimited Appointment records.
New Appointment Records
When you create a New Appointment Record, what happens depends on where you triggered the ‘Add New Appointment’ from:
Client Record or an existing Appointment Record - the app uses the existing Client/Patient information to link the new Appointment Record
Dashboard or Appointment List - the app needs to determine which Client/Patient this Appointment relates to so will display the Select Client/Patient dialog:
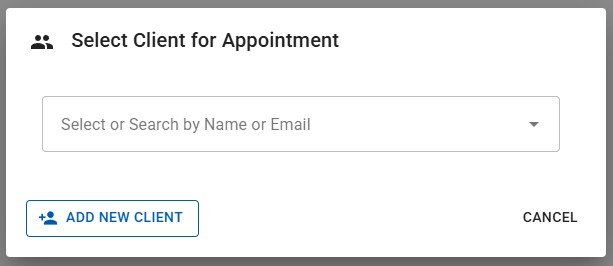
Selecting a Client/Patient
In the Select Client dialog, you can select a Client/Patient already in your database by either clicking the ‘Select or Search’ field and choosing a Client/Patient from the full list OR type characters into the field to filter the list by those characters. Delete the characters again to remove the filters, or click the ‘X’ button to reset the field.
When you are happy with your selection, click the ‘Select Client’ button to continue to the new Appointment Record.
Adding a New Client/Patient
If you do not yet have the relevant Client/Patient in your database, before creating the new Appointment Record you will need to create the Client/Patient Record. Click the ‘Add New Client/Patient’ button to open a New Client/Patient Record, and when you have completed that process, click ‘Save’ which will add the new Client/Patient to the database and then return you to the ‘New Appointment’ page.
Appointment Notes panel
Appointment Notes are a way to record information related to an appointment e.g. special requests/needs of the Client/Patient, observations, treatment progress, e.t.c. These can be added at any time, and if required can be automatically duplicated in the Client/Patient Record. They are for your use only and are not included in Appointment Reports.
The Notes are displayed in descending order of when they were created (most recent first).
Add/Edit a Note - Click the ‘Add Note’ button and a ‘New Note’ with today’s date will be added to the top of the table. Click on any Note to edit the wording and when you are finished, click the ‘Save Note’ button that appears to store changes permanently in the database. To undo any changes or stop editing a Note without saving, simply click the ‘Escape’ key (not Macs) or mouse click anywhere else on the page.
Delete a Note - Click the trashcan icon next to a Note to permanently delete it.
Copy to Client/Patient Notes - Select one or more Notes by checking their checkboxes, then click the ‘Copy to Client Notes’ button to add identical copies of the selected Notes to the Client Notes section of the Client/Patient Record.

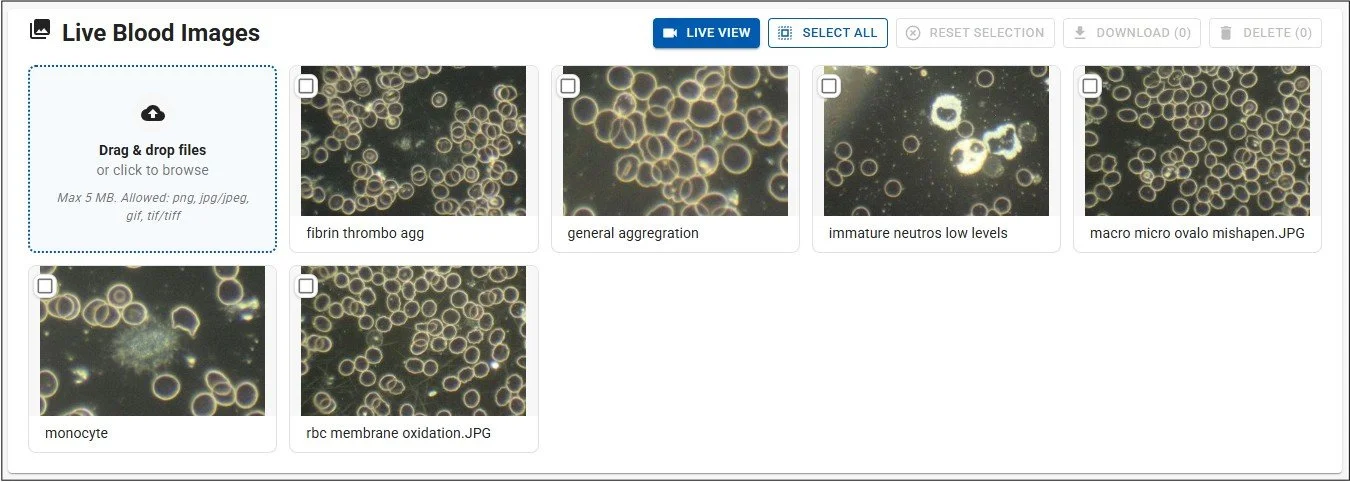
Blood Images panels
The Live Blood Images and Dry Blood Images panels are where appointment images are captured and stored. Images are represented in the panels with thumbnail versions that are displayed in a grid. In the ‘Pro’ version of the app 25 images per panel can be stored (12 for trial accounts), and their thumbnails are sorted by image title in ascending alphabetical order.
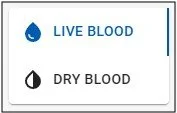
To switch between the Live and Dry panels, click the tabs at the right-side of the screen.
Both panels offer the same functionality:
Capture images from your microscope - use the ‘Live View’ panel to capture images.
Upload images from your computer - drag & drop or browse for images to upload them.
Rename images - edit image titles to make them more identifiable.
View large versions of images - click any thumbnail to open the Image View screen to view large versions of the stored images
Add Notes to each image - add Notes in the Image View screen, and view them at any time by hovering your mouse cursor over a thumbnail.
Capturing images from your microscope
Click the ‘Live View’ button to open the Live View panel and capture images from your microscope camera. Stored images are automatically represented as thumbnail versions in the relevant panel.
Read the ‘Live View panel’ page of the manual for more information.
Uploading images from your computer
You can upload blood images that you have captured outside of AnalystAssist and want to import into the appointment blood panels. These must be in .png, .jpg, .gif, .tif format and a maximum of 5MB filesize.
Drag & drop - in your computers storage or desktop, select one or multiple (by holding the Shift key) files. Press and hold the left mouse button and drag the files over to the blue panel. Release the mouse button to import the files.
Browse for files - click the blue panel with your left mouse key to open your computer’s File Explorer. Select one or multiple files (by holding the Shift key) and click the ‘Open’ button to upload the selected images.
Please Note: If your images are larger than 5MB, you can reduce their filesize for FREE using Adobe’s online re-sizer. Upload the image to the Adobe app, select a width of 1920 (which should reduce the filesize to less than 4MB) and then download the altered image to your computer. Also, adjust the image capture size in your microscope camera as a 5MB image is an unnecessarily large image size for a computer screen, taking up space on your computer.
Rename images
To give images a more identifiable title, click on the title in any thumbnail to enter ‘edit mode’. Make any required changes and to save changes to the database, click the ‘Enter’ key on your keyboard. To exit without saving and revert to the previously saved title, click your ‘Escape’ key (not Macs) or click somewhere else on the screen. Duplicate image titles are not allowed.
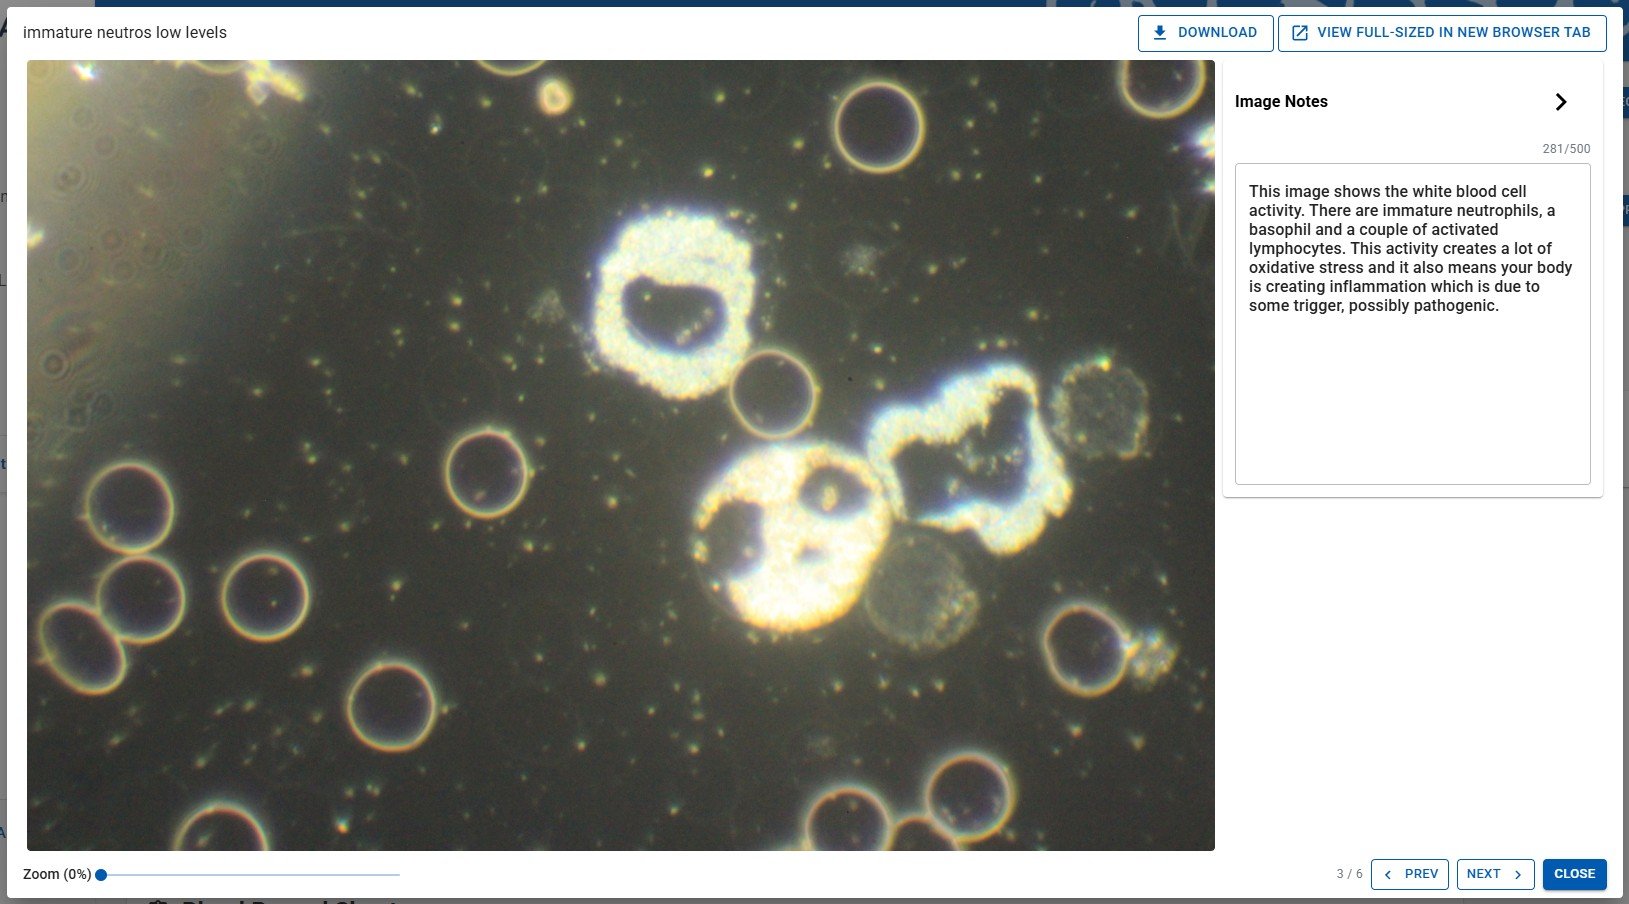
View large versions of images & add Image Notes
Click any thumbnail to open the Image View panel - this displays a large version of the image.
Image Notes - Click the ‘Image Notes’ collapsible panel to open or close it. Add text in the panel and it will be saved automatically. These Notes can be viewed at any time in the Appointment Record by hovering your mouse cursor over the thumbnail, and can be included in Appointment Reports.
View the image full-size - click the ‘View full-sized image in new browser tab’ button to open a separate browser tab that displays the image full-size.
Prev Img / NextImg - use the buttons in the bottom-right corner to move between any previous or next images in the gallery.
To close the Image View panel, click the ‘Close’ button in the bottom right corner, click the ‘Escape’ key (not Macs) or click elsewhere on the screen.
Blood Record Sheets
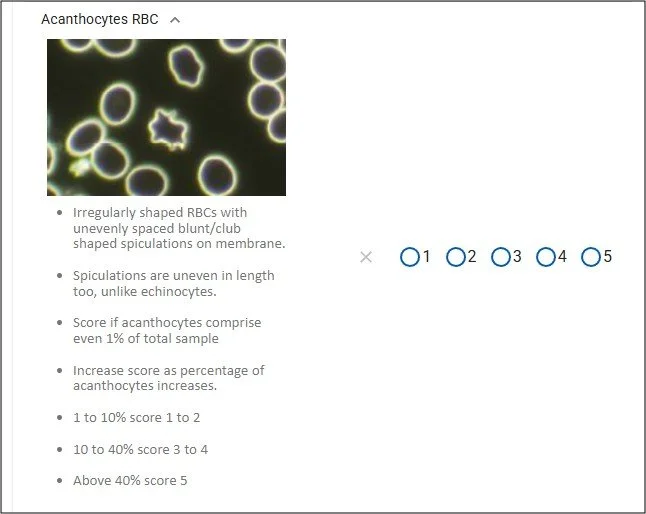
The Live Blood Record Sheet and Dry Blood Record Sheet enable you to record what you have seen in the Client/Patient’s blood systematically, so you can keep detailed records, build a holistic picture of your Client’s health and compare easily with other appointments. Blood Record Sheets include a list of Indications of what might be seen in Live or Dry Blood samples, and you can rate the strength of their presence, from ‘not present’ to ‘very strong presence’.
To open (or close again) the Blood Record Sheets panel, click the head of the collapsible panel.
Please Note: The blood record sheets (and their Indication Notes panels - see below) are also available directly in the Live View panel so they can be completed while you are reviewing the blood samples live.
Rating Indications
Indications can be rated 1-5 (or left un-rated) and the suggested key is displayed at the top of the panel:
[No Rating = Not Present; 1 = Low (presence is mild); 3 = Medium (presence is strong); 5 = High (presence is VERY strong)]
Please Note: To add/change or delete Indications from the default list, see the Settings page of the User Manual.
To rate an Indication, simply click the relevant numbered round button with your left mouse key, and the value will automatically be saved in the database. To clear an Indication rating, click the ‘X’ button next to it.
Each panel includes a ‘Show rated only’ switch, which when on filters the displayed list to only Indications that have been given a rating. This setting can be ON or OFF by default, which is set in the Settings screen.
Clicking the ‘Reset’ button will clear the Record Sheet of all ratings, and also update the Indications included to match the global Indications list set in the Settings screen.
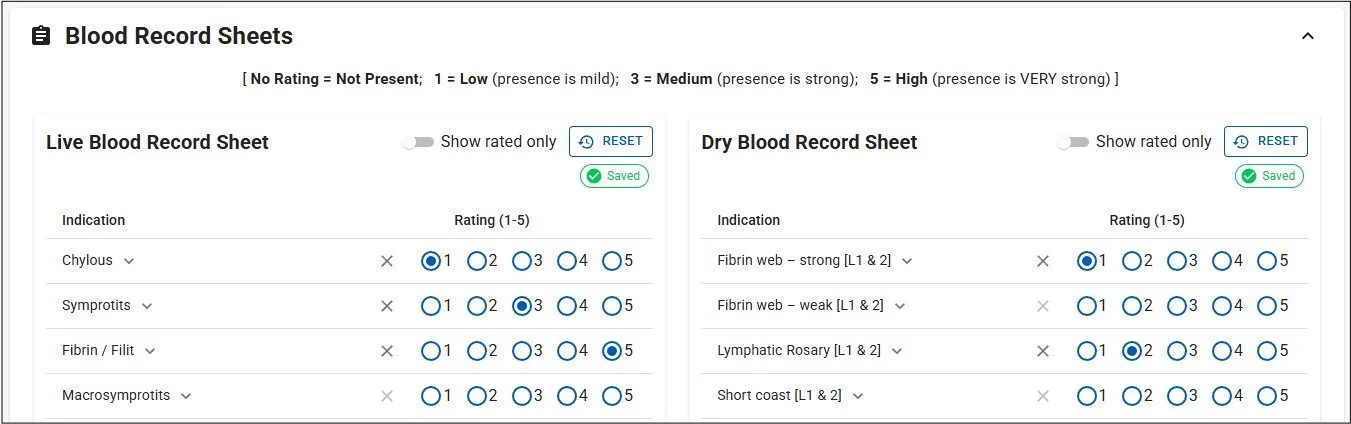
Indication Notes
To help you determine which rating is appropriate for each Indication, and to help you to identify Indications as you review blood slides, each Indication includes an Indication Note. These can be accessed by clicking the down arrow that is next to the Indication Name in the list.

Opening the Indication’s Notes panel will display the relevant Note.
Please Note: Indication Notes can be edited in the Settings Page as part of the Blood Record Indications panels.
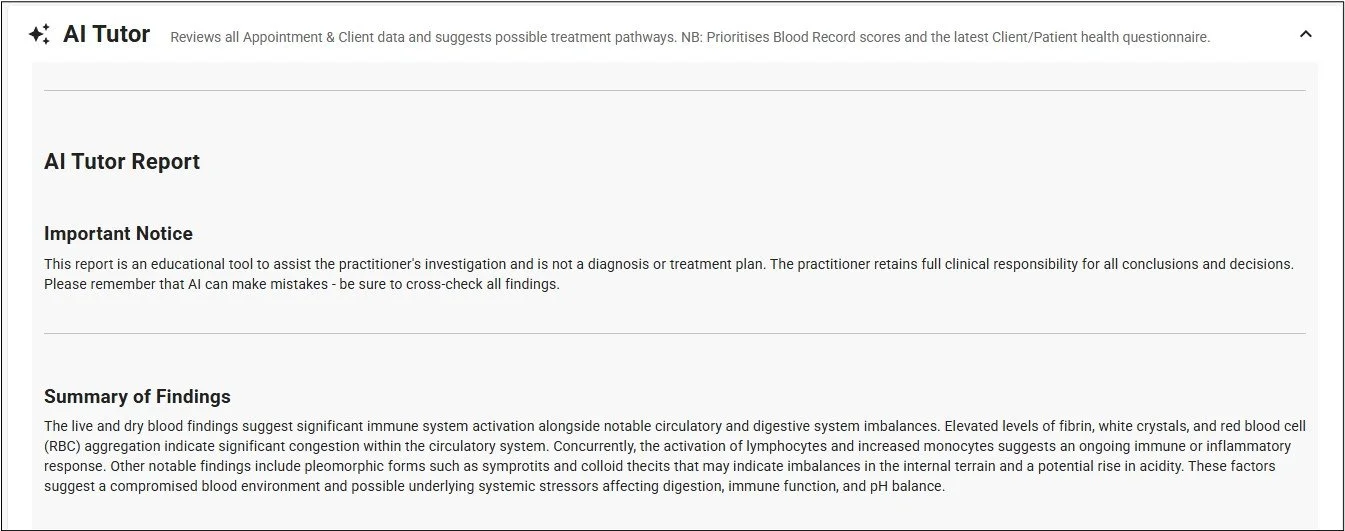
AI Tutor
The AI Tutor feature is a bespoke AI agent trained in Live & Dry Blood Analysis*. It is able to assimilate all Client/Patient data in the current Appointment record, in previous Appointment records and in the Client Record, and generate an analysis that gives suggestions for potential areas of investigation/treatment.
To open (or close again) the AI Tutor panel, click the head of the collapsible panel. To trigger the report click the ‘Generate Analysis’ button.
*The AI Agent is trained on content from Naturecure Academy’s Live & Dry Blood Analysis Training course.

The output includes:
Summary of Findings - a brief summary paragraph giving an overview of the AI analysis
Priority Health Areas for Investigation - a list of 3-5 of the main areas of health that investigation/treatment should be focused on.
Additional Health Areas of Attention - any other health factors raised by the Client data
Historical Context - a comparison with previous Appointments.
Please Note: Generated information is only a guide for analysts, and does not replace the need for practitioners to be fully trained in Live & Dry Blood Analysis. Please remember that AI can make mistakes - be sure to check all findings.
Data Included
The AI Agent feature uses all Client data to build a picture of the Client’s health, but prioritises certain elements:
Tier 1
The current Appointment’s Blood Record Sheet scores (refer to each Indication’s Notes for advice on scoring accurately - see above).
The most recently uploaded health questionnaire document in the Client’s Document Folder.
Tier 2
Previous Appointment Blood Record Sheet scores.
Older uploaded health questionnaire documents in the Client’s Document Folder.
Current Appointment Notes.
Other uploaded documents e.g. test results, medical reports.
Please Note: All data reviewed by the AI agent remains confidential and is not stored outside of the app.
Interpretation & Recommendation panels
These panels allow you to record observations, comments, suggestions and treatment plans. They are Dictation Rich Text Editor (DRTE) panels which auto-save all content and offer AI-powered dictation functionality to allow you to build fully-punctuated content hands-free.
You can include one or both of these panels in Appointment Reports generated for Client/Patients, depending on which template you use (see below).
To learn more about how to take advantage of the full functionality of DTRE panels, see this page of the User Manual.
Prescription / Protocol table
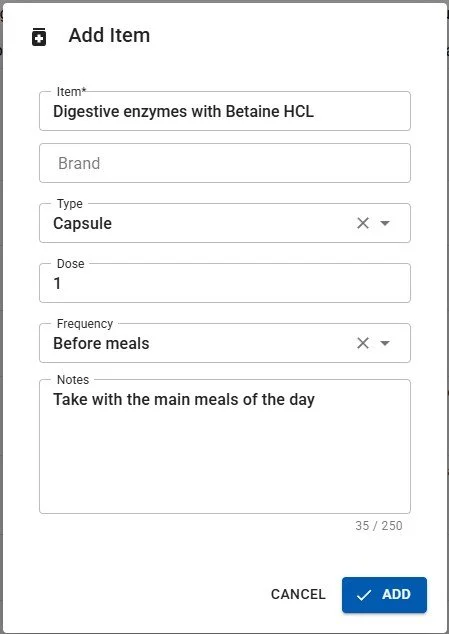
Within the Recommendations panel is a the Prescription / Protocol table, which allows you to include a list of supplements, medications, treatments or healthcare techniques for the Client/Patient.
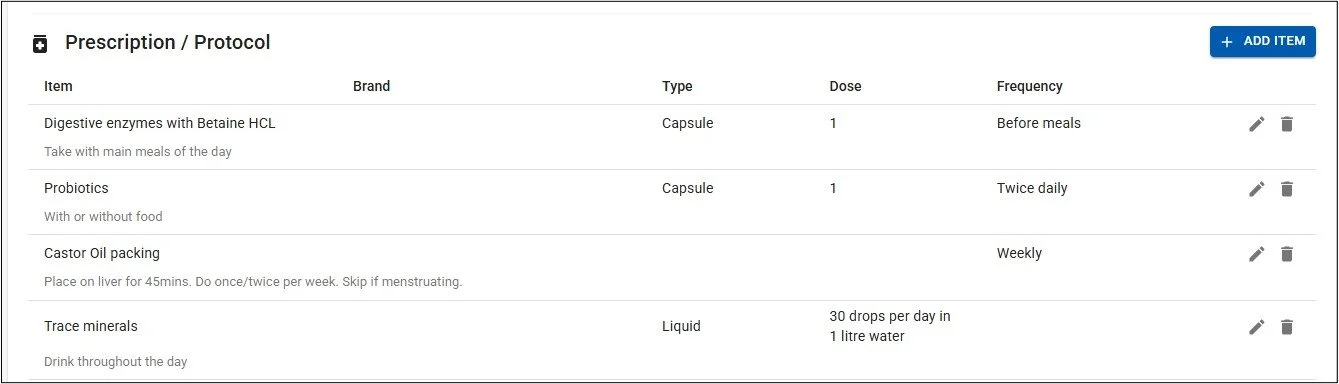
To add an item, click the ‘+ ADD ITEM’ button and the ‘Add Item’ dialog will appear. You can include Item Name (required), a particular Brand, the Type of item (e.g. tablet, tincture, e.t.c.), the Dose and the Frequency (e.g. Once daily, Before meals, e.t.c.). You can also add a Note to each item for your Client/Patient’s information.
When you are finished, click the ‘Add’ button to save the item or ‘Cancel’ to exit without saving
To edit an item, click the small pencil icon at the right hand end of the row in the Prescription / Protocol table, and to delete an item, click the trashcan icon at the end of the relevant row.
Please Note: The Prescription / Protocol table will only be added to Reports if there are items included. If there are, it will be added to Reports as part of the Recommendations section.
‘Type’ and ‘Frequency’ options can be managed / added in the Settings Page.
Creating Appointment Reports
One of the most powerful fatures of AnalystAssist is the platform’s ability to generate bespoke reports based on the information gathered during appointments, either to share with Client/Patients or for record keeping.
Appointment Reports are generated using Report Templates, and creating/changing templates can be learnt all about in this page of the User Manual.
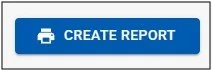
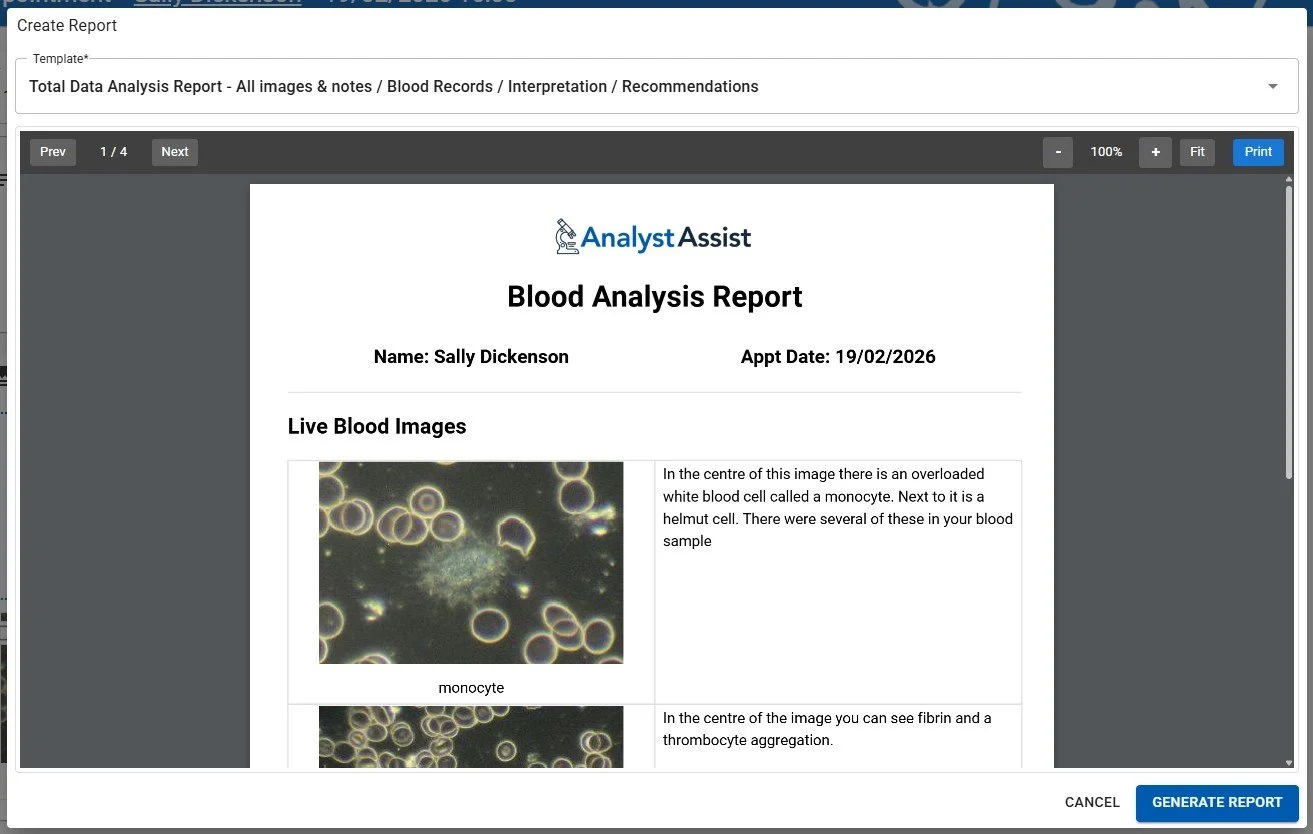
To trigger a low-resolution report preview, click the ‘Create Report’ button next to the Recommendations panel (or in the Main button drop-down menu at the head of the Appointment Record). This opens the Create Report dialog:
Select template - click the ‘Template’ field to display the drop-down list of all global Report Templates that are available. Select one to change the report preview to that new structure or click the field again, the ‘Escape’ key on your keyboard (not Macs) or elsewhere on the screen to close the list.
Please Note: Templates with names preceded with ‘*’ are intended for use by Naturecure Academy students.
Browse the report - use the scrollbar on the right to scroll down each page, or click the ‘Next’ or ‘Prev’ buttons to navigate between report pages. You can also zoom in or out of pages using the ‘+’ and ‘-’ buttons.
Cancel the report - to cancel the report generation process, click the ‘Cancel’ button or the ‘Escape’ key (not Macs).
Print a reportpreview (optional) - when you generate the report a .pdf copy will be saved to the Client/Patient Record which can be printed later, but if you want to print a copy now, you can click the ‘Print’ button and use your browser’s print functionality to print out a copy.
Generate the report - to generate the final .pdf Appointment Report click the ‘Generate Report’ button. This will add the report to the Client/Patient Record’s Document Folder, either for storage or for easy attachment to a Client/Patient email.
NB: A Note will also be added to the Appointment Notes, recording the report name and when it was generated, and a notification tab will flash up on screen that includes a direct link to the Document Folder where the report has been saved.
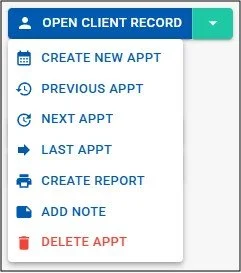
Main button menu
To the right of the details panel is the main button drop-down menu. The menu can be opened by clicking the green down arrow at the right-hand end:
Open Client Record - navigate to the Client/patient Record for this appointment.
Create New Appt - add a New Appointment for this Client/Patient.
Previous Appt - if this Client/Patient has another existing Appointment Record with Date/Time prior to this one, this button will navigate to that Record.
Next Appt - if this Client/Patient has another existing Appointment Record with Date/Time after this one, this button will navigate to that Record.
Last Appt - if this Client/Patient has one or more existing Appointment Records with Date/Time after this one, this button will navigate to the last Appointment Record.
Create Report - open the Create Report dialog to generate an Appointment report (see below).
Add Note - add a New Note in the Appointment Notes panel (see below).
Delete Appt - delete the Appointment Record (see below).
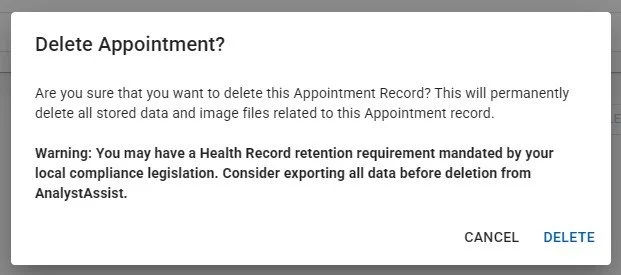
Deleting an Appointment Record
When you select the ‘Delete Appointment’ button in the main button drop-down menu, the ‘Delete Appointment?’ confirmation dialog is displayed.
Deleting the Appointment Record - Selecting ‘Delete’ in the ‘Delete Appointment?’ confirmation record will delete the Appointment Record permanently from the database (non-reversible), including:
All Appointment Notes & Blood Record Sheets and text content related to this Appointment Record.
All Blood Images related to this Appointment Record.
Cancel deletion - To exit the ‘Delete Appointment ?’ confirmation dialog without deleting the Appointment Record, click the ‘Cancel’ button, or click the ‘Escape’ key on your keyboard (not Macs).
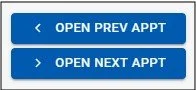
Appointment Navigation buttons
To the right of the Appointment Notes panel may be displayed the Appointment Navigation buttons. These display if there are Appointment Records related to this Client/Patient that are before or after this Appointment record in Date/Time.
Clicking either will navigate you to the relevant Appointment Record